• If you currently own, previously owned or want to own an Avalanche, we welcome you to become a member today. Membership is FREE, register now!

What did you do to your Avalanche today?

When I add pictures to my posts, I prefer to start composing my post and at the location within that post I want my picture to appear, I click on the "Insert Image" button on the toolbar, search for the picture on my computer ( I do not surf this forum using my cellphone), then choose the picture I want and confirm.

IMG_4662.JPG

I don't remember posting many videos other than links to Youtube videos, so I will be of little help in that regard.

Youtubes are easy, if you want to learn to upload those videos to your personal channel and post links here.

At any rate. let us know what you come up with.

I'd like to see what you have to share.
 
Thanks. I know how to post pictures it was the videos that stumped me.

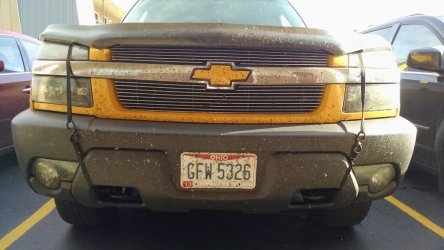
NICE truck!

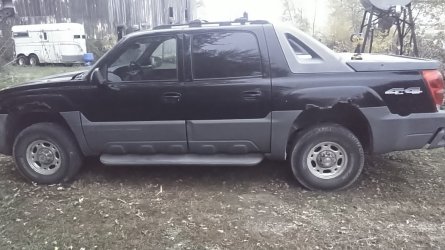
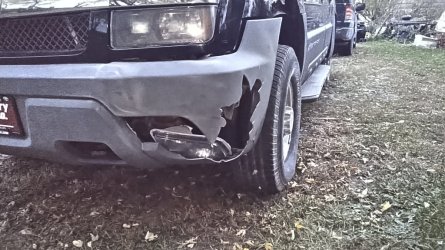
After looking at yours I think mine would be bringing the quality of the forum down LOL! All four corners have major sized rust holes, for example >

KIMG2769.JPG the cladding behind the drivers door is now removed because it was flapping in the wind due to nothing remaining behind it, the front cover has a huge hole broke out of it (I have a new aftermarket cover waiting in the pump house to be installed when the clips get here (hopefully Friday).

KIMG2775.JPG

The rear side cladding is just hanging over empty space where there used to be metal.

The one saving grace is that the interior is very nice, I think everything works as it should, and the engine and transmission have low miles. No good picture of it.

I've taken the drivers side running board off since this picture was taken because it was only hanging on by hope. When I bought the truck the running board had a cover on it, but it removed itself sometime after this picture was taken. Never saw it again.

Overall it's just like most of my other vehicles since about 2004 when I stopped buying a new vehicle every year since I can't stand the electronics in them. The 02 Dodge Ram 2500 is the last new vehicle I bought and it's now on it's last leg too. It needs a transmission. I have a donor truck with same transmission and transfer case it's just getting the two swapped out. I ain't as young as I used to be.
 
Last edited:
I have SS with supplemental part whatever insurance. But it's the paycheck to paycheck lifestyle that gets in the way... No working means no income. I made many disastrous financial decisions all throughout my life because I never expected to live this long (because I really didn't *want* to live this long). In addition I was overactive and did a lot of hurt to my body over the years. I have zero pension, no savings, I don't even have a savings account at the bank. But that's on me as I stated. Can't play catch-up now.

I might talk to the insurance company just out of curiosity to see what my out of pocket should be but it's the lost wages that combined with the copays and all coming in when I'm not able to work that would likely kill the deal.

I drive for a living, it fits my unorthodox lifestyle. Everyone tells me I should start a consulting business since I recently earned a master's degree in business management. But that sounds like too much work.
I transferred out of Medicare and got an Advantage plan through United Healthcare. The affiliate name may change from state to state, and there may be a better plan for your particular needs. My advise would be to get in touch with a consultant for some help. As your needs change, you can switch plans at the end of the year, except if you're upgrading to a five -star plan, in which case you can do that anytime if you're already an advantage member. BTW, you're fortunate to have an '02 with just 81K miles. My '05 1500 has 205K
 
I transferred out of Medicare and got an Advantage plan through United Healthcare. The affiliate name may change from state to state, and there may be a better plan for your particular needs. My advise would be to get in touch with a consultant for some help. As your needs change, you can switch plans at the end of the year, except if you're upgrading to a five -star plan, in which case you can do that anytime if you're already an advantage member. BTW, you're fortunate to have an '02 with just 81K miles. My '05 1500 has 205K
I have Aetna supplemental. They paid for my new eyes about 2 years ago. It still cost me near $1000 for two hospital visits and other misc.

Two months ago I got both an upper and lower GI "intrusion" tests done. Upper was no change, still have a hiata hernia and gastric erosion although I don't have GIRD anymore. Lower they found I have a micro infection (lymphocytic colonitus), sounds worse than it is. It's just too much lymph juice in my colon walls because my body thinks there an infection there when there isn't. It's an autoimmune problem.

They also just paid for two hyaluronic acid injections into my knees (not much improvement unfortunately) but those are fairly expensive too.

Overall I'm happy with them. Maybe next year I'll see who the cheapest is for new knees.
 
Last edited:
Happy daze! Everything showed up to finish rewiring my utility trailer and get the trailer socket on the truck, hopefully this work will fix the electrical feedback to the gauge cluster when I use the trailer and a turn signal light at the same time. I'm seriously baffled at why the PRND light blinks with the trailer plugged in. Nothing happens with the Ram when I pull it and all the lights on the trailer function normally.

Regardless, I bought a new socket (7 blade and 4 pin combo), new trailer lead wire (7 blade plug) new lights, a new junction box and new wire.

I also got the nylon clips for the front cover, now trying to figure out how to remove the old one. I see on the left side on the fender attachment point it's layered, it looks like the cover attached to an intermediate piece before that piece attachs to the fender.Can anyone clarify how this is put together? Do I need to save that middle piece and reuse it because I didn't see that on the new cover. But the truth be told I haven't unwrapped the new cover all the way yet.
 
@-JRW- easiest way to get the bumper cover off.
Remove parking lights & headlights
Remove grille

this will give you the space you need to release the 7 (I think) tabs along the top edge of the cover…kinda look like fingers. Use a 7mm socket for the screws in the wheel wells.

Much easier to pull the cover when the front looks like this. Just be careful of the tabs along the middle and bottom of the grille, but the grille pops off pretty quickly.

IMG_1811.jpeg

This is a decent video of how it’s done.


One thing he does in the video is install the fog lights before putting the new bumper in…this is a very good tip.
 
Last edited:
Once again, I find myself replacing parts I replaced 4 or so years ago.

I'm beginning to think if I get 4+ years out of anything, I'm ahead of the game.

This time around, the project got confirmed after having driven across town one night out in a raging thunderstorm several nights ago.

I had a suspicion that I was going to have to address this issue for a while now.

I had began to notice a slight amount of moisture inside the driver's side headlight, from time to time.

During this long drive in the thunderstorm, there was a significant amount of water inside the headlight assembly.

I had previously installed new headlights, turn signals and fog/DRL assemblies back in 2020 when I first bought the Avalanche used.

Funning thing is, none of the old original lenses had water leaks but were too badly frosted over to repair, so I opted to just replace.

So, with the current headlights beginning to show some signs of lens wear and with the new water leak, I decided to go ahead and just replace the headlight assemblies.

I removed everything I needed to get to the headlights, which includes the front grill and the turn signal assemblies.

The new headlight assemblies went in properly and the grill and turn signals reinstalled as expected.

Level adjustments were made.

It wasn't until a few days later that I found myself having to once again drive at night in a major thunderstorm, did I realize the headlight bulbs that came with the new headlights did not provide very good lighting during adverse conditions.

They were fine when just tooling down a dry neighborhood street, but during the storm, the drive home down the interstate was a little dicey.

I felt I could improve on the situation so I did some research and I purchased a set of NOVSIGHT 9005 9006 Led Bulbs Combo 300% Brightness 9005/HB3 High 9006/HB4 Low Dual Beam Bulbs 1:1 Mini Size LED Bulb Combo for Stock Bulb Replacement 6500K Cool White, Pack of 4.

This is the first set of LED headlight bulbs I have used on either of my trucks, so I am relying upon the online reviews (which could be a dangerous thing) and the high approval rating on Amazon.

One thing I am certain of is they are considerably brighter during my daytime testing, than the bulbs I took out.

Now, to find a dark night in a thunderstorm to really test the things.

I do not drive at night very often, so if these things are going to blind any of you, let me apologize ahead of time.

If anyone has any advice or impressions, I would like to hear them, as this is something new for me.

Now, this leads to the next part of the project and the part I did not plan upon.

As I have come to understand, once I touch something on my truck, the target of my original repair is seldom the end of the repair.

In this case, the removal of the grill and turn signal assemblies went without drama the first round.

However, when the turn signal assemblies had to be removed the second time to install the LED lights, the mounting tabs on one of the turn signals broke off clean preventing the assembly from holding in place.

Of course it did.

The two new turn signal assemblies arrived yesterday and were promptly installed.

I'm glad I did not have to touch the fog/DRL light assemblies during this repair or I am certain I would be replacing them, as well.

:E:

At this point this repair appears to be complete and functioning as expected.


Now ...

To continue with this theme, I return to the coolant leak saga.

After a few days of no leaks of any kind, a couple of new, small coolant leaks had appeared.

Of course they did.

On goes the radiator pressure tester again and out comes the mirror and LED shop light.

The first leak I found was one I should have known about and repaired before it even became a thing.

As you may recall, in a previous post I mentioned having to replace both the upper and lower radiator hoses to address a leak on the lower hose.

I should have left the upper hose alone.

:E:

As I was removing the upper hose from the radiator port, I had to remove the TWO hose clamps, one OEM spring clamp and one newer band clamp.

I do seem to remember thinking that was odd and when I reinstalled the new hose, I only used the OEM spring clamp thinking that would be proper and should do the job.

Now that I am finding a new coolant leak at that location, I am reminded as to why I had two clamps installed there.

Back in early 2020, when I was replacing a lot of parts on my newly acquired used 2003 Avalanche, a new radiator along with new belts and hoses were on the list of new parts.

At that time, I chased a coolant leak at the upper radiator hose port that I now remember as determining had to do with a slightly malformed radiator port that could not be sealed to the upper radiator hose using a single hose clamp.

My solution, at the time, was to install a second clamp and that has worked well for all of the past 4 years.

Until, I failed to install the second clamp when installing the new hose.

:E:

The OEM spring clamp has now been tossed in the trash bin and a pair of new band clamps are now installed and that leak is once again taken care of.

The other tiny leak was a little harder to find, but I now know where it is.

Once again (and never again) I chose to use the OEM spring clamp to attach the two heater core hoses to the water pump.

It took quite some time under pressure to finally catch the coolant leaking out at the rearmost heater hose where it attaches to the water pump.

This is a very tiny leak and when I get the opportunity and I feel like it, I am going to dive in and replace the OEM spring clamps that remain and hopefully finish this saga.

If you made it this far, let me finish my suggesting that if you are presented with a similar repair, plan on ditching any old OEM spring clamps and plan to install new modern band clamps.

What a pain this has been.
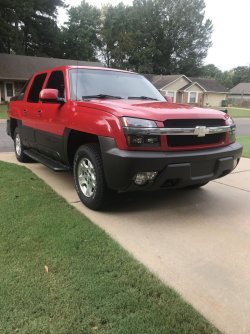
 
@EXT4ME :
My headlights got foggy with moisture too.
I redneck repaired them a few years ago with some clear gutter sealant, and when one headlight started getting a bit of water inside it again, I drilled a couple of tiny holes at the lower corners to let the water escape 😆
I hear you about those spring clamps. Years ago, I had the lower rad hose blow off because of a crappy spring clamp.
Had to walk for water and coolant. I learned my lesson that day. Never reuse those clamps. Once you take them off, they don't clamp back as well because they lose their tension after many years. Always throw them away and replace with new clamps - preferably worm gear clamps 👍
 
Today, I replaced all the belts, tensioners, and the idler pulley on my Av.
All the belts were cracked, and all the pulleys made noise (The A/C tensioner pulley even had slop and was not tracking correctly).
When I went to remove the A/C belt tensioner, I broke it because it was stuck...and a spring and a couple of plastic bits went flying. And one of the alignment ears broke off.
Good thing I resisted the urge to buy just a new pulley and not the whole tensioner assembly. I would have been hosed.
When you've been to many an automotive repair rodeo, you quickly learn what you can get away with, and what you can't! 😂
 
@EXT4ME I replaced the turn signal housing when one blew off on our 5,000 mile trip out west. I had to use straps to hold them in place for 4,000 out of the 5,000 miles. I bought and installed new housings and it was only three or four years that the tabs broke off of those. Not wanting to form out the coin for a new housing every few years, I drilled a hole near where the tabs are supposed to be and ran zip ties through them to hold them in place. I keep some extra zip ties in the truck in case I need to replace a light while traveling. The zip tie approach has yet to fail me.
 
@frito
The clip on the turn signal housing is super fragile, and as you know it will be broken in no time.
Same thing happened to me last summer when I was driving home from work and the turn signal fell out.
The wire saved it from getting lost. Lol...
When I got home, I remounted the turn signal housing, and then drilled a small hole thru where the clip usually goes.
Put in a drywall screw with a fender washer to hold it in place.
I think both turn signals are like that now. Can't recall.
If it works, it works! 👍
 
Two days ago, I made my most recent attempt at de-driptifying the coolant leaks on the Avalanche.

As mentioned above, I had located what I believed to be the final teenie-tiny leaks of the cooling system where the two heater hoses connect to the new water pump using the OE spring clamps.

After making sure I had a good supply of new worm-type band clamps, I dove into this project, hopefully for the last time for a while.

Normally, I do not use double clamps, but since this project has bested me a time or two recently and I have a full compliment of new worm clamps, I decided, what the heck.

The pipes coming out of the water pump are long enough to allow two clamps to sit side by side on the end of the hose nicely.

So, the old OE spring clamps were removed and discarded and a pair of new worm clamps were carefully positioned and tightened down on each of the hoses.

The entire area was washed down with the garden hose and the coolant topped off using the prescribed factory service manual procedure.

I drove the Avalanche around for an hour or so and parked it on a clean spot on the driveway overnight.

No leaks were observed the next morning.

Not to leave any doubt, I pressurized the cold coolant system to 15 PSI and left it pressurized for several hours.

No leaks were observed.

We drove the truck around last night for a while and this morning, no signs of any leakage.

I am sure I have now jinxed myself and I will report my dismal failure when the next leak presents itself.

Dang.
 
I don't blame you for doing your due diligence on finding and fixing the leaks but I would have hated to see the look on your face had you found one after all that. It's soul crushing to work so hard and still experience defeat. CONGRATULATIONS! :yourock::cheers:
 
Last edited:
@-JRW- easiest way to get the bumper cover off.
Remove parking lights & headlights
Remove grille

this will give you the space you need to release the 7 (I think) tabs along the top edge of the cover…kinda look like fingers. Use a 7mm socket for the screws in the wheel wells.

Much easier to pull the cover when the front looks like this. Just be careful of the tabs along the middle and bottom of the grille, but the grille pops off pretty quickly.

View attachment 237322

This is a decent video of how it’s done.


One thing he does in the video is install the fog lights before putting the new bumper in…this is a very good tip.
Somehow I missed this post o_O:E:

Thank you!

I had taken the one off in the junk yard but the grill section had already been removed so that made the cover simple. The 64,000 dollar question - is it really necessary to remove the grill or does that just make it much easier?

So, now I'm curious as to the grill removal. Pulling the top plastic push pins - got that part. The top plastic is a part of the entire grill or no? I see on the far outer ends there's elongated holes, are bolts or more push clips in those?

Then there's the row of metal push clips along the middle bar? Go in from where to pry them out? Is that the (almost obscenely obvious) reason for removing the top plastic, getting behind the bar to push those clips out?

The lower cover is the easy part I guess, just the bottom, brace, and side bolts, and two or so plastic clips on both sides. And the claws along the top.


OK, now for the part I just decided to add after seeing it on your picture, a front hitch.

That would make moving my hay racks around so easy as opposed to starting the big tractor which is still a pain because backing a hay rack, even after doing it for about 30 years, is a PITA.

If there's some here that are unfamiliar with hay racks; think of a very large (9x16 or longer) Radio Flyer four wheel wagon with a tow handle hooked up behind a garden tractor going backwards. If it starts straight it's possible to go straight back about ten feet before steering corrections need to be made and therein lies the problem. Having to steer to compensate for two pivot points and the length of the wagon and the legnth of the tow vehicle. It's NOT even a 100th as easy as backing up a normal trailer.

All steering input is just like you'd be driving forwards except going backwards. Then steering the front of the tow vehicle to compensate for the turning angle before the hitch goes over center is key because when that happens it's all over and it's time to start again.

The length of the tow vehicle and it's turning radius are also very much a part of it. I can back an empty rack up with my garden tractor in reverse pretty good, but even the quick steering (power steering) and maneuverability of something that short can cause problems but it makes it about 90 times easier than with the big tractor. Still a PITA, the garden tractor isn't very big and it's uncomfortable for me sit on (John Deere 31:cool:.

Sorry for the diatribe. I just think that since I have a few trailers and hay racks that are always being moved around that being able to see what's going on before everything gets out of kilter might be a blessing.
 
Last edited:
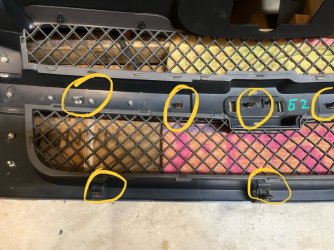
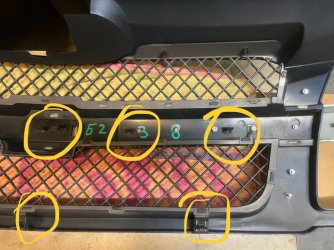
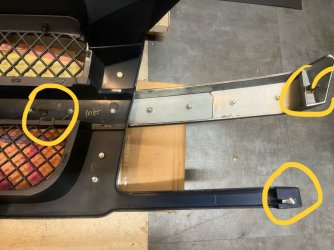
So, now I'm curious as to the grill removal. Pulling the top plastic push pins - got that part. The top plastic is a part of the entire grill or no? I see on the far outer ends there's elongated holes, are bolts or more push clips in those?

Then there's the row of metal push clips along the middle bar? Go in from where to pry them out? Is that the (almost obscenely obvious) reason for removing the top plastic, getting behind the bar to push those clips out?
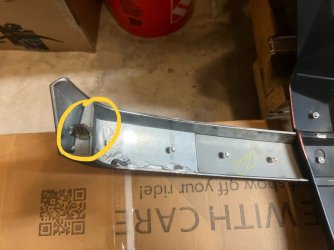
@-JRW- Yes the top is part of the grille. You need to pry the outside clips on the powerbar first, then I just stick my fingers in between the grille lattice and gently pry it out. I’ve marked all the clips below.IMG_2092.jpegIMG_2093.jpegIMG_2094.jpegIMG_2095.jpeg
 
Last edited:
Back
Top