• If you currently own, previously owned or want to own an Avalanche, we welcome you to become a member today. Membership is FREE, register now!

How to change the Fuel Pump.

MyBigToy said:
Here's the eBay seller I bought the one for the Taurus from; they have both the fuel pump repair kit and the whole fuel pump for the Av.

global-automotive

Just cut/paste their name from above and look for their store.

The whole pump is: Item number: 150243417851 (costs $95.00)

The repair kit is item number: 160179070540 (costs $39.95)

So far, so good with my replacement pump for the Taurus. The car was was stalling out when driving after hot starts and hasn't done it since I replaced the pump.


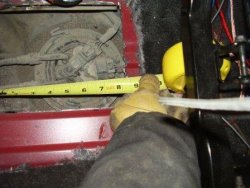
I have the repair kit, it rides next to my Amp under the seat. Ready to go!. I hope I never need it but it sure makes me fell warm an fussy knowing it's ready to help me....

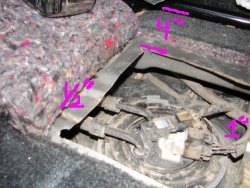
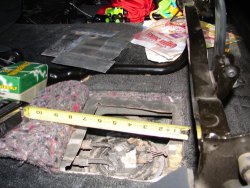
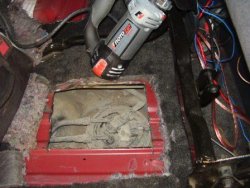
Anyone who has the 'hole' should have a spare one....lol
 
Thanks, I will do the whole, I want to lower the tank a bit to be sure I do not cause any damage. How much clearance is there between the floor and the tank? My fuel pump died today, lucky for me it made it to the neighbors house and only needed to be pushed about 20 feet to get in my driveway. Now she won't even start long enough to drive into the garage. I am going to have some friends come over and help out.
 
The item numbers have changed but the ACDelco#MU1088 GM#25345024, are the part numbers for the repair kit. I think I might just get 2 so I have a spare for my tool box. Hell I carry a Torque wrench, impact sockets and a 24" breaker bar. I also carry a 6 ton hydralac floor jack and 6 ton jack stand with wheel chocks. A 118 piece socket set, so why not an extra fuel pump repair kit?
 
Shanes 02 Avalanche said:
Thanks, I will do the whole, I want to lower the tank a bit to be sure I do not cause any damage. How much clearance is there between the floor and the tank? My fuel pump died today, lucky for me it made it to the neighbors house and only needed to be pushed about 20 feet to get in my driveway. Now she won't even start long enough to drive into the garage. I am going to have some friends come over and help out.

Here are a couple more photos to answer this question.  The front edge (towards drivers seat) is about 5/8 from floor to top edge of fuel lines.  Stay 1/2" or shallower to be safe.  The back edge you have about 1" from floor to electric wire loom, stay 3/4" or shallower to be safe.

When cutting the whole (based on my 2002) stay about 4 1/4" from the seat frame that is near the center of the AV and when measuring forward from the crossmember of the seat frame start about 1" forward of the frame and bring the opening to about 8 1/2" to 9" forward of that crossmember.  My opening is a bit short and makes it a bit difficult to disconnect those lines.  Hopefully the floor pan is the same and you can judge your cuts by the photos.  Also, make the 3 cuts in the carpet about 1 1/2" larger on all 3 sides with the non-cut edge forward to keep it looking neat when viewed from the front.  I made sheetmetal shoulders and glued them to the cut out piece so it will set back over the opening and stay put when the carpet is covering it.


Attachments

  • FuelPump a-100.JPG
    FuelPump a-100.JPG
    98.9 KB · Views: 1,650
  • FuelPump b-100.JPG
    FuelPump b-100.JPG
    97 KB · Views: 1,649
Thanks that helps a lot. That is enough room to work with. I ordered the reapir kit today so it should be here sometime next week.
 
Add a bodylift, the tank will be 3 " further away.....lol

bummer about the pump going. They ship quick in my experience


awesome pics, INresponse
 
I had an old Olds Cutlass Supreme that I just drove back home to Long Island from MD and the next morning it was dead in the driveway and ended up being the fuel pump. Got to love that  :love:
 
I have to admit I have only had one car break down away from home. My wife's Honda had the clutch go out in Iowa on our way back to Idaho from Wisconsin. Other than that all my vehicles have died at home. makes it a lot easier to work on them.
 
Do I have to remove the fuel lines to install the rebuild kit? And how much room will the lines give me for movement? I am going to do the cutting tomorrow to gain access to the pump. I think this is the better way to go in the long run. I am hoping to get another rebuild kit next month to carry in the Av, along with my other extra stuff. Gotta love the storage bins.
 
Shanes 02 Avalanche said:
Do I have to remove the fuel lines to install the rebuild kit? And how much room will the lines give me for movement? I am going to do the cutting tomorrow to gain access to the pump. I think this is the better way to go in the long run. I am hoping to get another rebuild kit next month to carry in the Av, along with my other extra stuff. Gotta love the storage bins.

You have to remove the fuel lines, but you squeaze the sides of the fittings and the lines come out fairly easy.  But that is why I suggested making the opeing a bit larger than I did.  Loosen the retaining ring on the pump first, this will allow you to move the pump assembly a little to get them out of the hard, premolded lines that don't move much.  Also, you may not be able to get the locking ring back on if you use the new O-ring gasket from the repair kit.  I fought with it for a long time to get it together with the new gasket, the second time I was in there I went back to the stock gasket and the locking ring went on easier with just enough effort to make me confident the seal was good.
 
When cutting the floor pan, it needs to start about 4 1/4" from that seat frame support and come towards the door until about this ridge in the floor pan.  I didn't measure this distance, not sure why, but the car seats are lashed down again in the back of the AV so I can't get to it again to measure it now.  Look at this photo and plan it out carefully.  Or this second photo I stole from cadboy's post.
 

Attachments

  • FuelPump c-100.JPG
    FuelPump c-100.JPG
    95.1 KB · Views: 1,571
  • fuelpump d-100.JPG
    fuelpump d-100.JPG
    69.1 KB · Views: 1,581
Thanks looks like I am good with my cut. I will mark the metal in the morning and get it cut out. I will also get photos.
 
Just looking through this thread, I think a new pump may be in my future. The truck still runs fine, but the pump is starting to get really loud. Can someone post a picture of the patch pannel that you used to cover up the whole please. This seems so much easier than pulling the tank. Just have to explain to the wife why I am taking a cut off wheel to her truck. ;D
 
homebrew,

In my reply #28 above I have a couple pictures.  One of them shows the plate to the top left of the photo.  I took 4 pieces of alluminum and cut them about 2" wide.  I then used some type of glue, like JB Weld or similar, to glue the alluminum to the cut out panel, leaving about 1" overhand on all 4 sides.  A little bit of hammer work made the alluminum close to form fitting.  I then slide it under the carpet and it sits still over the opening.

It is in the second photo, between the toy truck and the box of bullets.  >:D
 
some rtv and 2 screws youll have containment...... er .....a non entry point..... maybe you need a drain....lol
 
I was thinking of actually trying to hinge the plate back in since it is covered under the seat and my speaker box. I did buy a Roto Zip attachment that allows me to set the depth on my cuts. I figure I will do the ribs first, then adjust the distance to cut the valleys correctly. I am also doing the same to an 04 Focus for a friend of mine.
 
OK I got mine cut out today. Here are some pics with a tape measure for size. I used a Root Zip to cut the whole. It took about 30 minutes to do the measurements and use a felt pen to draw the lines. I went 6" from the 41/2 mark towards the door. And 8" from the 1" mark from whee the carpet was cut.

One word of advice, sand the cuts after you get done. This will help prevent tearing youe habds up with metal cuts later. I learner the hard way, I have 6 little cuts from hitting the jagged edges.
 

Attachments

  • Hole finished.JPG
    Hole finished.JPG
    35.4 KB · Views: 1,537
  • length.JPG
    length.JPG
    32.9 KB · Views: 1,534
  • Width.JPG
    Width.JPG
    8.7 KB · Views: 1,591
OK I took the fuel pump out( don't do this with as much gas as I have,5/8 tank), it makes a mess. Anyways how do you remove the fuel line from the pumping mechinism that is inside the pump housing. I have not firgured that out yet. I have the plugs off and the outside container off, but I cannot get the line to budge. Any help?
 
I replied to your PM, I am pretty sure one of the lines does not come off.  YOu should get new lines with the rebuild kit.  I think I needed one small hose clamp, that wasn't supplied, to hold one line secure.  I think the other line had a clamp or something to hold it.

When you get your rebuild kit you will see what I am talking about.
 
Thanks again for the help. I am very upset with the company I ordered the rebuild kit from. It has been 4 days and I still do not have a pump. I could have ordered one from Summit and had it here in 2 days regular shipping. I have to drive the wife's Honda Civic, which is a 5 speed and it causes really bad pain in my back and left knee. I also do not like looking at my poor baby sitting in the garage doing nothing.
 
Shanes 02 Avalanche said:
OK I got mine cut out today. Here are some pics with a tape measure for size. I used a Root Zip to cut the whole. It took about 30 minutes to do the measurements and use a felt pen to draw the lines. I went 6" from the 41/2 mark towards the door. And 8" from the 1" mark from whee the carpet was cut. There is also more room than I was thinking when I cut mine. I used a height adjuster on my Roto Zip and set it for 1/4". I burned thru the $30.00 blade by the time I had most of the cutting done. So I used one of the 2 metal blades I bought for $4.00 a set, to finish the job. So if you do this MOD, you really would have to try very hard to hit the fuel lines or tank.

One word of advice, sand the cuts after you get done. This will help prevent tearing your hands up with metal cuts later. I learner the hard way, I have 6 little cuts from hitting the jagged edges.
 
Are there any problems with water getting in that trap door? Mine NEVER goes off road but I don't want the carpet getting wet. So far my pump seems good, when I had my injectors cleaned a long while back the member who did it said my fuel pressure was on the low side, I don't remember what it was but he thought maybe it was the pump.........That is good news about the rebuild kit for the pump, it sounds easy....at least you guys make it sound that way!


Butch
 
The only way I can see water getting to the carpet is if you went thru a bunch of deep water. The pump sits in the middle part of the front of the tank. The only thing I found on top of my tank was some Small stones and a little dirt. But I do take mine off road a lot and get it pretty dam dirty. I even got stuck and had it buried up to the bumpers this fall.
 
Back
Top