Samsquanch
Full Member
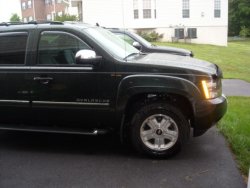
Well I've had my 2010 LS and already can't stop adding things to it. My latest addition are the GM factory chrome mirror tops. I elected to install them myself because it appeared simple enough... that is until I attempted the whole process. Hopefully somebody here finds this document useful because it was tricky and could save you from damaging your new mirror tops during installation. Alternatively you could just buy the cheap chrome stick-ons... but the end result isn't as seamless, and the quality usually isn't at par with OEM factory parts.
Document should apply to 2007-2010 models and likely other GMT900 platformed vehicles.
So lets get started!
Boring mirror tops!")


Ooo shiny!
I picked these up at the local GM dealer for $124.00 CAD after taxes. Both mirror tops and vague GM install instructions are included in the box

Pay attention to these clips because you don't want to snap them off by accident during the install

Tools of the trade (You might not elect to use all of them)
Painters masking tape, stainless steel spudger, a square of cardboard and a couple small flat drivers

Step 1)
I suggest masking the entire bottom of the mirror where the edges meet to prevent chewing it up while moving the spudger across it.
Step 2)
I started at the end furthest from the door. I gradually slipped the end of the spudger into the underside and begin moving it in a very gentle twisting motion at the same time moving it gradually towards the vehicle side. When I came to a clipped area of which there are 3 if you can imagine where they are (use your new mirror tops as a reference point) I gave it bit more of a twisting and prying motion until you can feel it release (you'll hear a snapping sound). You'll begin to see the mirror top separate from the mirror face. If you noticed I wedged a piece of cardboard under the spudger as well as I moved it back and forth. This kept the spudger from making contact with the mirror housing to prevent damage. It also acted as a wedge to keep the mirror top separated.

Step 3)
You want to use either your fingers or small flat blade screw driver to aid the separation of the mirror top from the mirror face. I chose to use my fingers and gave it a bit of a pulling and slight rocking motion until it started to release even more. Now unfortunately I don't think there is even a way you can remove these tops without snapping off the supporting clips. If you were hoping to save the original tops for another project you might be out of luck. Anybody who manages to remove the tops unscathed gets 100 points! The snapping sound you hear during removal is likely one or 2 of the 3 clips breaking off.
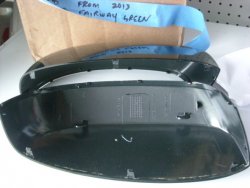
Here is what the mirror looks like minus the top. Those 3 arrows show where the clips hold the mirror cover to the mirror housing.

Step 4)
Installing the covers is also a tad bit tricky because if you make the wrong move it could cost a chunk of change because there really isn't another way to hold these things on. When installing them look underneath to ensure all 3 clips are aligned in the holes. I supported the mirror on each side with my left and right hand and slowly pushed it on until the clips clicked in checking to ensure that I wasn't about to snap one off. After the mirror was mostly in, go around it and use your palm and go around all the edges to ensure that its fully locked in place and that there are no gaps showing. Give it a nice polish with a microfiber cloth and you've done it! I spent over 30 minutes using different tools, poking around trying to find a way to pull it off only to realize it was a lot simpler than that. But you need to be careful. After that ordeal the passenger side mirror went on in less than 5 minutes.
End result ...lookin goooood!

From Boring to Ballin'

I even scanned the official GM install instructions for reference. If purchased from a dealer you will receive this multi-language document.
http://www.dmt07.com/_docs/GM_ACC-88967579.jpg
Happy modding!
- Jonny
Document should apply to 2007-2010 models and likely other GMT900 platformed vehicles.
So lets get started!
Boring mirror tops!
Ooo shiny!
I picked these up at the local GM dealer for $124.00 CAD after taxes. Both mirror tops and vague GM install instructions are included in the box
Pay attention to these clips because you don't want to snap them off by accident during the install
Tools of the trade (You might not elect to use all of them)
Painters masking tape, stainless steel spudger, a square of cardboard and a couple small flat drivers
Step 1)
I suggest masking the entire bottom of the mirror where the edges meet to prevent chewing it up while moving the spudger across it.
Step 2)
I started at the end furthest from the door. I gradually slipped the end of the spudger into the underside and begin moving it in a very gentle twisting motion at the same time moving it gradually towards the vehicle side. When I came to a clipped area of which there are 3 if you can imagine where they are (use your new mirror tops as a reference point) I gave it bit more of a twisting and prying motion until you can feel it release (you'll hear a snapping sound). You'll begin to see the mirror top separate from the mirror face. If you noticed I wedged a piece of cardboard under the spudger as well as I moved it back and forth. This kept the spudger from making contact with the mirror housing to prevent damage. It also acted as a wedge to keep the mirror top separated.
Step 3)
You want to use either your fingers or small flat blade screw driver to aid the separation of the mirror top from the mirror face. I chose to use my fingers and gave it a bit of a pulling and slight rocking motion until it started to release even more. Now unfortunately I don't think there is even a way you can remove these tops without snapping off the supporting clips. If you were hoping to save the original tops for another project you might be out of luck. Anybody who manages to remove the tops unscathed gets 100 points! The snapping sound you hear during removal is likely one or 2 of the 3 clips breaking off.
Here is what the mirror looks like minus the top. Those 3 arrows show where the clips hold the mirror cover to the mirror housing.
Step 4)
Installing the covers is also a tad bit tricky because if you make the wrong move it could cost a chunk of change because there really isn't another way to hold these things on. When installing them look underneath to ensure all 3 clips are aligned in the holes. I supported the mirror on each side with my left and right hand and slowly pushed it on until the clips clicked in checking to ensure that I wasn't about to snap one off. After the mirror was mostly in, go around it and use your palm and go around all the edges to ensure that its fully locked in place and that there are no gaps showing. Give it a nice polish with a microfiber cloth and you've done it! I spent over 30 minutes using different tools, poking around trying to find a way to pull it off only to realize it was a lot simpler than that. But you need to be careful. After that ordeal the passenger side mirror went on in less than 5 minutes.
End result ...lookin goooood!
From Boring
to Ballin'
I even scanned the official GM install instructions for reference. If purchased from a dealer you will receive this multi-language document.
http://www.dmt07.com/_docs/GM_ACC-88967579.jpg
Happy modding!
- Jonny